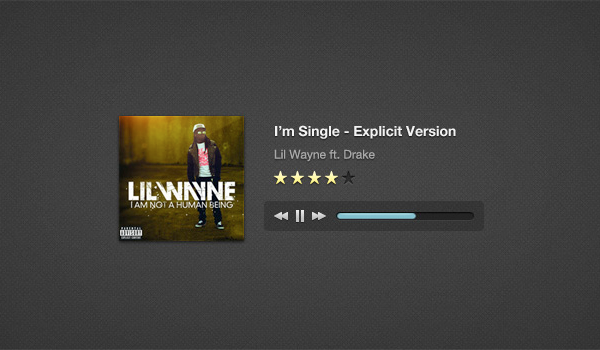
我将展示如何将 HTML 5 音乐播放器集成到 WordPress 中。之后,我们将添加一个设置页面(“主题选项”),以便您可以轻松自定义播放器!
这款音乐播放器终于登陆 WP 了!该设计最初是由 Orman Clark 创建的,之后来自 Codebase Hero 的 Saleem 创建了一个 jQuery 插件。
今天我将把这个插件集成到 WP 中。我想指出的是,我不是高级 WP 开发人员,我将使用的代码是从网络上的各种教程编译而来的。我只想与大家分享我是如何做到的。另外,我不会解释 Saleem 创建的 jQuery 插件代码,我可以帮助回答任何问题,但最好的办法是转到插件页面并浏览文档。您可以下载源文件并根据您的喜好进行自定义。好吧,让我们开火吧..
我们要做的事情
希望在本教程结束时,您将能够:
- 将 HTML5 音乐播放器集成到 WP
- 创建自定义帖子类型 + 自定义元框
- 为您的音乐播放器创建设置页面
第 1 步下载源文件
首先下载所需的源文件,并将名为“blank”的文件夹复制到所有主题所在的 wp-content/themes/ 文件夹中。您将需要这些文件来完成本教程!
您的目录应如下所示:wp-content/themes/blank。
好的,从现在开始,我们将在您的“空白”主题文件夹中工作。
步骤 2 创建其他文件夹和文件
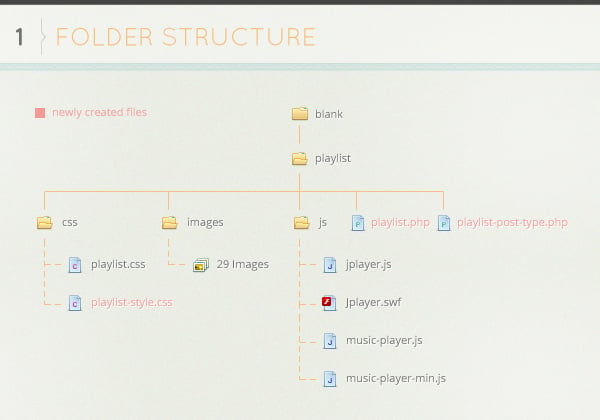
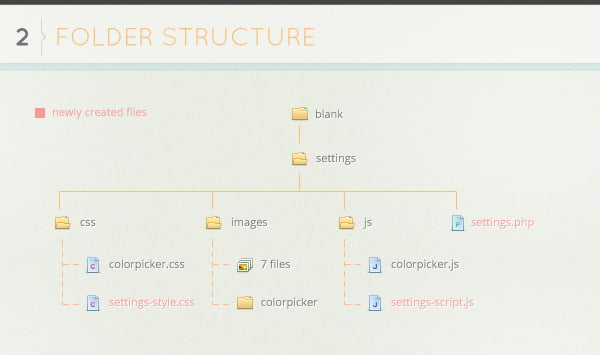
转到您下载的源文件文件夹并将播放列表文件夹复制到您的主题文件夹中。该文件夹包含 3 个文件夹 css、images 和 js。
这些文件夹包含 HTML5 音乐播放器附带的所有文件和图像,我们不会编辑它们。
让我们创建更多文件。在播放列表文件夹内创建 2 个文件 playlist.php 和 playlist-post-type.php。现在打开css文件夹并创建一个文件playlist-style.css。
查看下面的文件夹结构图像,确保您拥有所有正确的文件。
第 3 步自定义帖子类型 - 播放列表
让我们创建名为播放列表的帖子类型。有关自定义帖子类型的更多信息,请参见 WP Codex。打开playlist-post-type.php文件。
'
<?php
// Adding Custom Post Type
add_action(\'init\', \'playlist_register\');
function playlist_register() {
		$labels = array(
        \'name\'					=> _x(\'Playlist\',\'Music Player\',\'Music Player\'),
        \'singular_name\'		=> _x(\'Music Player\',\'Music Player\', \'Music Player\'),
        \'add_new\'				=> _x(\'Add New Track\', \'Music Listing\',\'Music\'),
        \'add_new_item\'			=> __(\'Add New Track\',\'Music\'),
        \'edit_item\'			=> __(\'Edit Track\',\'Music\'),
        \'new_item\'				=> __(\'New Music Post Item\',\'Music\'),
        \'view_item\'			=> __(\'View Music Item\',\'Music\'),
        \'search_items\'			=> __(\'Search Music Items\',\'Music\'),
        \'not_found\'			=> __(\'Nothing found\',\'Music\'),
        \'not_found_in_trash\'	=> __(\'Nothing found in Trash\',\'Music\'),
        \'parent_item_colon\'	=> \'\'
        );

        $args = array(
        \'labels\'				=> $labels,
        \'public\'				=> true,
        \'exclude_from_search\'	=> false,
        \'show_ui\'				=> true,
        \'capability_type\'		=> \'post\',
        \'hierarchical\'			=> false,
        \'rewrite\'				=> array( \'with_front\' => false ),
        \'query_var\'			=> false,
        \'menu_icon\'			=> get_stylesheet_directory_uri() . \'/playlist/images/playlist.png\',
        \'supports\'				=> array(\'title\', \'editor\', \'thumbnail\'),
        );
        register_post_type( \'playlist\' , $args );
        }

// Maker sure any other code added to playlist-post-type.php is above this text! The closing php tag needs to be last peice of code in this file!
?>
这里是非常基本的东西,这将在我们的管理仪表板菜单中创建一个名为“播放列表”的新帖子类型。现在你还看不到它,因为我们还没有真正附加它。因此,我们需要返回主主题目录并打开 functions.php 文件。添加以下内容。
'
// DEFINE PATHS
define(\'OD_PLAYER\', TEMPLATEPATH . \'/playlist/\');	// Playlist Directory

// REQUIRE FILES
require_once(OD_PLAYER . \'/playlist-post-type.php\');	// Get Custom Post Type : Playlist
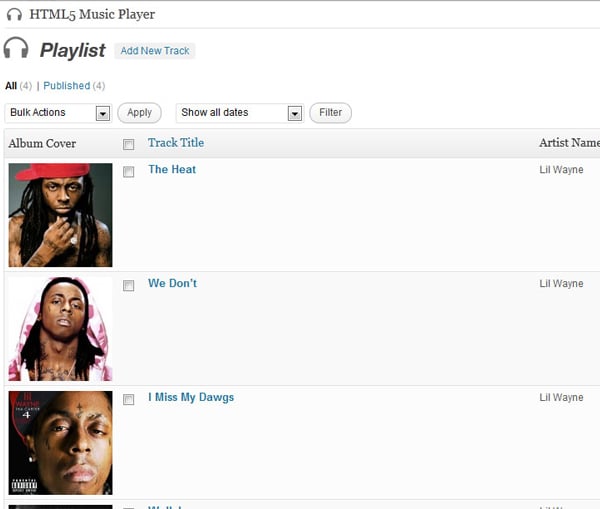
返回仪表板并刷新页面,您现在应该能够在菜单中看到播放列表。单击“播放列表”,您会注意到现在我们有显示标题和日期的默认列。我们想要进入并将列更改为与我们的帖子类型更相关的内容。我们将添加专辑封面、曲目标题和艺术家姓名列。打开 playlist-post-type.php 并添加此内容。
'
//Custom Overview Page<br />add_action("manage_posts_custom_column", "music_custom_columns");
add_filter("manage_edit-playlist_columns", "my_areas_columns");<br />function my_areas_columns($columns)
{
$columns = array(
	"thumbnail"	=> "Album Cover",
	"cb"		=> "<input type=\"checkbox\" />",
	"title"		=> "Track Title",
	"artist"	=> "Artist Name"
);
	return $columns;
}
function music_custom_columns($column)
{
	global $post;
	if ("ID" == $column) echo $post->ID;
	elseif ("artist" == $column)
		echo get_post_meta(get_the_ID(),\'music_artist\',true);
	elseif ("thumbnail" == $column) the_post_thumbnail(\'album-thumb\');
}
这看起来好多了,你不觉得吗?好的,让我们向该文件添加更多内容。我想要这个帖子类型的自定义图标。如果您点击“添加新曲目”,您会注意到当前图标只是 WP 默认的“图钉”,让我们添加耳机图标。
'
// Adding Custom Screen Icons on Edit and Add New Screens
add_action(\'admin_head\', \'plugin_header\');
function plugin_header() {
	global $post_type;
    ?>
    <style>
    <?php if (($_GET[\'post_type\'] == \'playlist\') || ($post_type == \'playlist\')) : ?>
    #icon-edit { background:transparent url(\'<?php echo get_stylesheet_directory_uri() .\'/playlist/images/playlist_large.png\';?>\') no-repeat; }
    <?php endif; ?>
    </style>
    <?php
    }
我还想将自定义 css 添加到我们的新帖子类型中,因此让我们附加一个 css 文件,添加以下内容。
'
//Add Custom CSS to the post
add_action(\'admin_head\', \'tracklist_admin_css\');
function tracklist_admin_css() {
	global $post_type; if (($_GET[\'post_type\'] == \'playlist\') || ($post_type == \'playlist\')) : ?>
	<link rel=\'stylesheet\' type=\'text/css\' href=\'<?php echo get_stylesheet_directory_uri() .\'/playlist/css/playlist-style.css\';?>\' />
	<?php endif;
}
稍后我们将添加一些样式,现在让我们继续向我们的帖子类型添加内容。最后要添加的是元框。在此之前,我们需要知道需要添加什么类型的输入。这很容易,因为我们已经知道,因为我们正在构建“成品”产品。 HTML5 音乐播放器包含一个具有以下选项的文件。
'
var myPlaylist = [
{
  mp3:\'mix/1.mp3\',
  oga:\'mix/1.ogg\',
  title:\'Sample\',
  artist:\'Sample\',
  rating:4,
  buy:\'#\',
  price:\'0.99\',
  duration:\'0:30\',
  cover:\'mix/1.png\'
}
];
我应该立即指出的一件事是我们不会关注音乐播放器的“评级”部分。好的,从中我们可以看出我们需要以下输入:
- mp3(元输入)
- ogg(元输入)
- 标题(帖子标题)
- 艺术家(元输入)
- 购买(元输入)
- 价格(元输入)
- 持续时间(元输入)
- 封面(特色图片)
让我们添加带有这些项目的元框。如果输入字段中保存了某些内容,下面的代码基本上将预填充输入字段(我们将在此之后进行填充)。
'
// Adding Custom Meta Information for tracks
	add_action(\'add_meta_boxes\', \'music_add_custom_box\');
    function music_add_custom_box() {
    	add_meta_box(\'track_info\', \'Track Information\', \'track_box\', \'playlist\',\'normal\', \'high\');
	}
function track_box() {
	$music_mp3 = \'\';
	if ( isset($_REQUEST[\'post\']) ) {
		$music_mp3 = get_post_meta((int)$_REQUEST[\'post\'],\'music_mp3\',true);
	}

	$music_ogg = \'\';
	if ( isset($_REQUEST[\'post\']) ) {
    	$music_ogg = get_post_meta((int)$_REQUEST[\'post\'],\'music_ogg\',true);
    }

	$music_artist = \'\';
	if ( isset($_REQUEST[\'post\']) ) {
    	$music_artist = get_post_meta((int)$_REQUEST[\'post\'],\'music_artist\',true);
    }

	$music_buy = \'\';
	if ( isset($_REQUEST[\'post\']) ) {
    	$music_buy = get_post_meta((int)$_REQUEST[\'post\'],\'music_buy\',true);
    }

	$music_price = \'\';
	if ( isset($_REQUEST[\'post\']) ) {
    	$music_price = get_post_meta((int)$_REQUEST[\'post\'],\'music_price\',true);
    }

	$music_duration = \'\';
    if ( isset($_REQUEST[\'post\']) ) {
    	$music_duration = get_post_meta((int)$_REQUEST[\'post\'],\'music_duration\',true);
    }

	$check = "";
    if ( isset($_REQUEST[\'post\']) ) {
    	$check = get_post_meta((int)$_REQUEST[post],\'music_thumb_url_check\',true);
    }

	$music_thumb_url = \'\';
    if ( isset($_REQUEST[\'post\']) ) {
    	$music_thumb_url = get_post_meta((int)$_REQUEST[\'post\'],\'music_thumb_url\',true);
    }

	?>
请注意,我们此时还将关闭 php 标签。我们稍后会重新开放。我们必须关闭 php,因为我们将向文件添加一些 html。上面我们创建了一个函数,它将检查每个输入字段并查看是否保存了任何内容,如果是,它将自动将这些值填充到字段中。让我们添加输入
'
<div id="track_list">

<div>
	<label for="music_mp3">MP3</label>
	<input id="music_mp3" class="widefat" name="music_mp3" value="<?php echo $music_mp3; ?>" type="text">
</div>

<div>
	<label for="music_ogg">OGG</label>
	<input id="music_ogg" class="widefat" name="music_ogg" value="<?php echo $music_ogg; ?>" type="text">
	<p style="padding-left:140px;"><a href="http://media.io/" target="_blank">Convert your music files online here</a> then use Upload/Insert <img src="images/media-button-music.gif" /></p>
</div>

<div>
	<label for="music_artist">Artist</label>
	<input id="music_artist" class="widefat" name="music_artist" value="<?php echo $music_artist; ?>" type="text">
</div>

<div>
	<label for="music_buy">URL To Purchase</label>
	<input id="music_buy" class="widefat" name="music_buy" value="<?php echo $music_buy; ?>" type="text">
</div>

<div>
	<label for="music_price">Song Price</label>
	<input id="music_price" class="widefat" name="music_price" value="<?php echo $music_price; ?>" type="text">
</div>

<div>
	<label for="music_duration">Song Duration</label>
	<input id="music_duration" class="widefat" name="music_duration" value="<?php echo $music_duration; ?>" type="text">
</div>

</div>
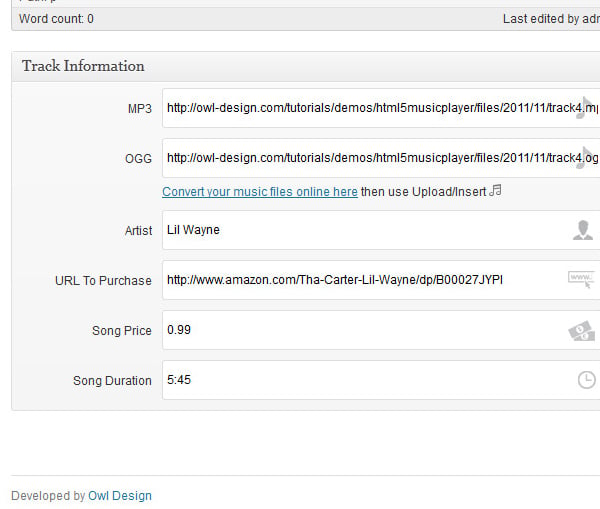
尝试一下。点击“添加新曲目”,您现在应该看到输入字段。另外,您还会注意到我在 OGG 输入下添加了一个链接,这只是我在网上找到的用于在线将 mp3 文件转换为 OGG 格式的链接。稍后我们将设置整个内容的样式,现在让我们确保这些输入字段实际保存我们的输入,添加此代码。
'
<?php
}
add_action(\'save_post\',\'catalog_save_meta\');
function catalog_save_meta($postID) {
	if ( is_admin() ) {
		if ( isset($_POST[\'music_mp3\']) ) {
			update_post_meta($postID,\'music_mp3\', $_POST[\'music_mp3\']);
		}
		if ( isset($_POST[\'music_ogg\']) ) {
			update_post_meta($postID,\'music_ogg\', $_POST[\'music_ogg\']);
		}
		if ( isset($_POST[\'music_artist\']) ) {
			update_post_meta($postID,\'music_artist\', $_POST[\'music_artist\']);
		}
		if ( isset($_POST[\'music_buy\']) ) {
			update_post_meta($postID,\'music_buy\', $_POST[\'music_buy\']);
		}
		if ( isset($_POST[\'music_price\']) ) {
			update_post_meta($postID,\'music_price\', $_POST[\'music_price\']);
		}
		if ( isset($_POST[\'music_duration\']) ) {
			update_post_meta($postID,\'music_duration\', $_POST[\'music_duration\']);
		}
	}
}
好的,现在如果您尝试保存,它将保存数据。我们现在拥有功能齐全的自定义帖子类型。让我们添加一些 css 到它上面。打开 playlist-style.css,还记得之前我们在自定义帖子类型代码中添加了自定义 css 文件吗?让我们设置这些输入的样式。添加以下内容。
'
/* Playlist Overview Page */
.column-thumbnail { width: 125px; padding:5px !important; }
/* Custom CSS For Post Type */
#track_list { background:url(../images/playlist_bg.png) no-repeat right center;}
#track_list label { display:block; width:130px !important; float:left; padding-top:15px; padding-right:10px; text-align:right; }
#track_list div {  clear:both !important; margin-bottom:10px; }
#track_list input { height:40px !important; width:440px !important;}

/* Input Icons */
#music_mp3 { background:url(../images/note_icon.png) no-repeat right center #fff; }
#music_ogg { background:url(../images/note_icon.png) no-repeat right center #fff; }
#music_artist { background:url(../images/artist_icon.png) no-repeat right center #fff; }
#music_rating { background:url(../images/rating_icon.png) no-repeat right center #fff; }
#music_buy { background:url(../images/url_icon.png) no-repeat right center #fff; }
#music_price { background:url(../images/money_icon.png) no-repeat right center #fff; }
#music_duration { background:url(../images/clock_icon.png) no-repeat right center #fff; }
我们现在已经完全完成了自定义帖子类型。
还有一个要编辑的文件...
还记得我之前展示的这段代码吗?
'
var myPlaylist = [
{
  mp3:\'mix/1.mp3\',
  oga:\'mix/1.ogg\',
  title:\'Sample\',
  artist:\'Sample\',
  rating:4,
  buy:\'#\',
  price:\'0.99\',
  duration:\'0:30\',
  cover:\'mix/1.png\'
}
];
这基本上就是我们将使用我们创建的自定义帖子类型和元框预填充的所有信息。打开并将以下代码添加到 playlist.php 中。
'
<script type="text/javascript">
var myPlaylist = [
<?php query_posts(array(\'post_type\' => \'playlist\')); ?>

<?php while(have_posts()): the_post(); ?>
<?php $thumbnail = wp_get_attachment_image_src( get_post_thumbnail_id ( $post->ID ), "album-thumb"); ?>

	{
		mp3:\'<?php echo get_post_meta(get_the_ID(),\'music_mp3\',true); ?>\',
		oga:\'<?php echo get_post_meta(get_the_ID(),\'music_ogg\',true); ?>\',
		title:\'<?php the_title() ?>\',
		artist:\'<?php echo get_post_meta(get_the_ID(),\'music_artist\',true); ?>\',
		buy:\'<?php echo get_post_meta(get_the_ID(),\'music_buy\',true); ?>\',
		price:\'<?php echo get_post_meta(get_the_ID(),\'music_price\',true); ?>\',
		duration:\'<?php echo get_post_meta(get_the_ID(),\'music_duration\',true); ?>\',
		cover:\'<?php echo $thumbnail[0] ?>\'
	},

<?php endwhile; ?>

];
</script>
这是我们针对自定义帖子类型“播放列表”的自定义循环。我正在使用 get_post_meta 来提取所需的数据。这就是我们循环所需的全部内容。在下一节中,我们将启动实际的音乐播放器。实际上,在继续之前,我们需要对 functions.php 文件进行一些小的添加。打开它并在 // Post Thumbnails 区域中添加以下行。这是为了确保当有人添加特色图像时,会将其裁剪为 125x125。
'
add_image_size(\'album-thumb\', 125, 125, true); // Album Cover > Cropped
现在应该看起来像这样......
'// Post Thumbnails<br />add_theme_support(\'post-thumbnails\');
set_post_thumbnail_size(150, 150); // Post Thumbnails
add_image_size(\'album-thumb\', 125, 125, true); // Album Cover > Cropped
就这样,让我们继续。
第 4 步 让它工作 - 音乐播放器
好的,现在我们的自定义帖子类型已经完全可以将其全部连接到音乐播放器了。
返回主题目录并打开header.php。以下全部内容。
'
<!-- Playlist Styles -->
<link rel="stylesheet" href="<?php bloginfo(\'template_url\'); ?>/playlist/css/playlist.css">

<!-- Playlist JavaScripts -->
<script src="<?php bloginfo(\'template_url\'); ?>/playlist/js/jplayer.js"></script>
<script src="<?php bloginfo(\'template_url\'); ?>/playlist/js/music-player.js"></script>
<script>
	$(document).ready(function(){
		$(\'.music-player\').ttwMusicPlayer(myPlaylist, {
			tracksToShow:3,
			description:\'Hello, this is a demo description\',
			jPlayer:{
				swfPath: \'<?php bloginfo(\'template_directory\'); ?>/playlist/js/\',
			}
		});
	});
</script>
如果您正确地遵循了教程,您现在应该拥有一个可以正常工作的音乐播放器。恭喜!
如果您将此用于个人用途,您可以根据需要轻松更改音乐播放器的外观。但如果你像我一样,选择走得更远,那就继续吧。例如,如果我为客户制作这个,我知道他们不想与 css 文件有任何关系。我需要创建一个“主题选项”页面。在本教程中,我将其称为“播放器设置”页面,并将其粘贴到“添加新曲目”下方的“播放列表”菜单中。
我不会做出太多选择,但足以让你们在需要时轻松添加更多选项。
第 5 步 播放器设置 - 一般外观
从下载的源文件中复制settings文件夹并将其粘贴到空白主题文件夹中。在 settings 文件夹中创建一个 php 文件并将其命名为 settings.php,然后打开 css 文件夹并创建 settings-style.css 。然后返回并在 js 文件夹中创建名为 settings-script.js 的文件。请参阅下面的文件夹结构图片并确保所有内容都匹配!
设置.php
是的,打开settings.php并让我们编写一些选项。首先我们需要做的是附加我们在设置文件夹中的 css 和 js 文件。使用此代码即可做到这一点。
'
<?php
  // JavaScript
  add_action(\'admin_init\', \'settings_page_include_js\');
  function settings_page_include_js(){
  wp_register_script(\'settings_page_js\', get_template_directory_uri().\'/settings/js/settings-script.js\', false);
  wp_enqueue_script(\'settings_page_js\');
  wp_register_script(\'settings_page_js_colorpicker\', get_template_directory_uri().\'/settings/js/colorpicker.js\', false);
  wp_enqueue_script(\'settings_page_js_colorpicker\');
}
// CSS
  add_action(\'admin_print_styles\', \'settings_page_include_styles\');
  function settings_page_include_styles(){>
  wp_register_style(\'settings_page_style\', get_template_directory_uri().\'/settings/css/settings-style.css\', false);
  wp_enqueue_style(\'settings_page_style\');
  wp_register_style(\'settings_page_colorpicker\', get_template_directory_uri().\'/settings/css/colorpicker.css\', false);
  wp_enqueue_style(\'settings_page_colorpicker\');
}
这里我们为 colorpicker 添加了 js 和 css,以及稍后我们将编写的自定义脚本。下一段代码将初始化我们的选项并将播放器设置页面添加到播放列表帖子类型的子菜单中。
'
/* Init plugin options to white list our options */
add_action( \'admin_init\', \'theme_options_init\' );
function theme_options_init(){
register_setting( \'odthemes_options\', \'odthemes_theme_options\', \'theme_options_validate\' );
}
/* Add Player Settings Menu to the custom post type \'tracklist\' */
add_action( \'admin_menu\', \'theme_options_add_page\' );
function theme_options_add_page() {
add_submenu_page(\'edit.php?post_type=playlist\', __( \'Player Settings\', \'odthemes\' ), __( \'Player Settings\', \'odthemes\' ), \'edit_theme_options\', \'theme_options\', \'theme_options_do_page\' );
}

/* Create the options page */
function theme_options_do_page() {
if ( ! isset( $_REQUEST[\'settings-updated\'] ) )
$_REQUEST[\'settings-updated\'] = false;

?>
如果您刷新仪表板页面,您目前还看不到该链接,这是因为我们实际上还没有告诉 WP 运行 settings.php 文件。因此,返回主题文件夹的根目录并打开 functions.php 并添加这段代码。
'
define(\'OD_THEME_OPTIONS\', TEMPLATEPATH . \'/settings/\');	// Theme Options Directory

require_once( OD_THEME_OPTIONS . \'/settings.php\' );	// Get Settings
使用我们旧的functions.php代码,这些行应该如下所示......
'
// DEFINE PATHS
define(\'OD_PLAYER\', TEMPLATEPATH . \'/playlist/\');	// Playlist Directory
define(\'OD_THEME_OPTIONS\', TEMPLATEPATH . \'/settings/\');// Theme Options Directory

// REQUIRE FILES
require_once(OD_PLAYER . \'/playlist-post-type.php\');	// Get Custom Post Type : Playlist
require_once( OD_THEME_OPTIONS . \'/settings.php\' );	// Get Settings
现在,返回您的 settings.php 文件并继续。此时如果您刷新页面,则会出现语法错误。没关系,因为我们关闭了 php,而我们的函数仍然打开。我们将在该函数中添加 html 代码。一旦我们完成添加 html 代码并关闭函数,语法错误就会消失。
让我们继续将代码添加到 settings.php 文件的末尾。
'
<!-- OD Panel Page Wrap -->
<form method="post" action="options.php">
<div id="od-panel">

<!-- Border Styles all around -->
<div class="glowbr">

<!-- Header -->
<div id="od_header" class="polish">
	<a id="od_logo" href="<?php echo get_admin_url(); ?>edit.php?post_type=playlist&page=theme_options">OD Themes Framework</a>
	<div class="clear"></div>
</div>

<div id="od_bar"></div> <!-- Graphic Bar below the header -->
<!-- END Header -->

<!-- Save Changes Main Button -->
<div class="button-zone-wrapper zone-top">
	<div class="button-zone">
		<span class="top"><button class="save secondary" id="od_save" name="od_save" type="submit"><?php _e("Save Changes","odfw"); ?></button></span>
	</div>
</div>

<?php settings_fields( \'odthemes_options\' ); ?>
<?php $options = get_option( \'odthemes_theme_options\' ); ?>

<!-- Content Container -->
<div id="od_main">


<!-- WE WILL BE ADDING PAGE CONTENT CODE HERE -->


<div class="clear"></div>
</div><!-- END Content Container -->
</div>

<?php if ( false !== $_REQUEST[\'settings-updated\'] ) : ?>
<div class="updated fade"><p><strong><?php _e( \'Options saved\', \'odthemes\' ); ?></strong></p></div>
<?php endif; ?>

</div>
</form>
<!-- END OD Panel Page Wrap -->

<?php
}
?>
我在代码中添加了一些注释,这样我就不必真正解释什么是什么。如果有任何问题,请添加评论,否则只需查看代码及其基本 html。如果您现在刷新,您将能够看到名为“播放器设置”的新菜单项出现。该页面为空白,带有标题和保存更改按钮。
让我们添加一些页面。
'
<!-- Sidebar Navigation Container -->
<div id="od-panel-sidebar">
	<ul class="tabs">
		<li class="general"><a href="#od-panel-section-general">General Settings</a></li>
		<li class="appearance"><a href="#od-panel-section-appearance">Player Appearance</a></li>
		<li class="misc"><a href="#od-panel-section-misc">Miscellaneous</a></li>
	</ul>
</div>
这些将是我们的选项卡。现在我们将为选项卡页面添加一个容器,为每个部分分配一个 ID,以便稍后我们可以将该特定页面定位到选项卡。
'
<!-- Tabs Containers -->
<div id="od-panel-content" class="tab_container">


<!-- General Section | Tab 1 -->
<div class="od-panel-section tab_content" id="od-panel-section-general">

<!-- Number of Tracks to Display -->
<div class="od-panel-field">
	<fieldset class="title">
		<label class="description" for="odthemes_theme_options[music_tracks_to_show]"><?php _e( \'Number of Tracks\', \'odthemes\' ); ?></label>
		<div class="od-panel-description">Number of tracks to display on the playlist?</div>
	</fieldset>
	<fieldset class="data">
		<input id="odthemes_theme_options[music_tracks_to_show]" class="regular-text" type="text" name="odthemes_theme_options[music_tracks_to_show]" value="<?php esc_attr_e( $options[\'music_tracks_to_show\'] ); ?>" />
	</fieldset>
<div class="clear"></div>
</div>

<!-- Descripiton Text -->
<div class="od-panel-field">
	<fieldset class="title">
		<label class="description" for="odthemes_theme_options[music_player_description]"><?php _e( \'Description\', \'odthemes\' ); ?></label>
		<div class="od-panel-description">Add description for the player.</div>
	</fieldset>
	<fieldset class="data">
		<textarea id="odthemes_theme_options[music_player_description]" class="large-text" cols="50" rows="10" name="odthemes_theme_options[music_player_description]"><?php echo esc_textarea( $options[\'music_player_description\'] ); ?></textarea>
	</fieldset>
<div class="clear"></div>
</div>
</div>


</div> <!-- END Tabs Containers -->
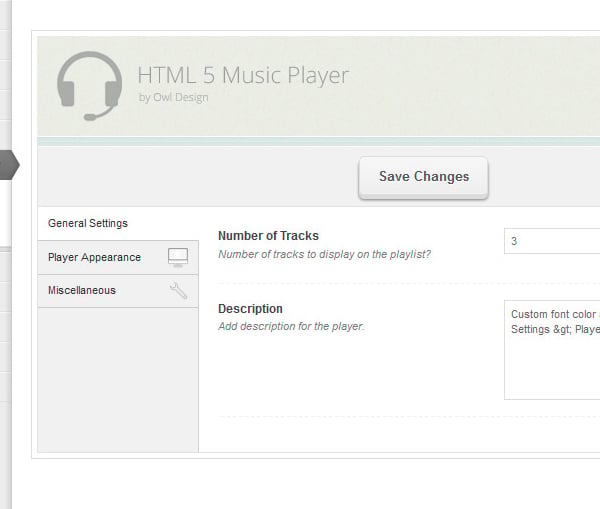
在上面的代码中我已经添加了一些选项。基本上,这是具有两个选项的常规部分选项卡 div。只需添加另一个带有“od-panel-field”类的 div 即可添加选项。我添加的选项是要显示的曲目数和音乐播放器的描述。
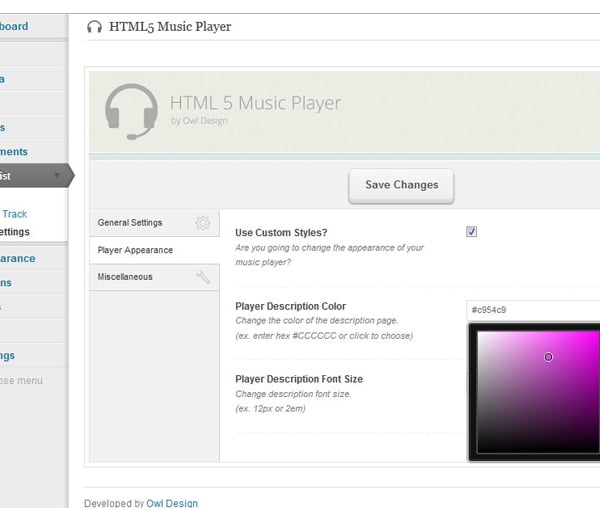
让我们添加另外两个部分。玩家外观及杂项
'
<!-- Appearance Section | Tab 2 -->
<div class="od-panel-section tab_content" id="od-panel-section-appearance">

<!-- Change Appearance Checkbox -->
<div class="od-panel-field">
	<fieldset class="title">
		<label class="description" for="odthemes_theme_options[od_custom_css]"><?php _e( \'Use Custom Styles?\', \'odthemes\' ); ?></label>
		<div class="od-panel-description">Are you going to change the appearance of your music player?</div>
	</fieldset>
	<fieldset class="data">
		<input id="odthemes_theme_options[od_custom_css]" class="checkme" name="odthemes_theme_options[od_custom_css]" type="checkbox" value="1" <?php checked( \'1\', $options[\'od_custom_css\'] ); ?> />
	</fieldset>
<div class="clear"></div>
</div>

<!-- Show Settings if Appearance checkbox is checked -->
<div id="extra">

<!-- Description Font Color -->
<div class="od-panel-field">
	<fieldset class="title">
		<label class="description" for="odthemes_theme_options[od_font_color]"><?php _e( \'Player Description Color\', \'odthemes\' ); ?></label>
		<div class="od-panel-description">Change the color of the description page. <br />(ex. enter hex #CCCCCC or click to choose)</div>
	</fieldset>
	<fieldset class="data">
		<input id="colorpicker" class="regular-text" type="text" name="odthemes_theme_options[od_font_color]" value="<?php esc_attr_e( $options[\'od_font_color\'] ); ?>" />
	</fieldset>
<div class="clear"></div>
</div>

<!-- Description Font Size -->
<div class="od-panel-field">
	<fieldset class="title">
		<label class="description" for="odthemes_theme_options[od_font_size]"><?php _e( \'Player Description Font Size\', \'odthemes\' ); ?></label>
		<div class="od-panel-description">Change description font size. <br />(ex. 12px or 2em)</div>
	</fieldset>
	<fieldset class="data">
		<input id="odthemes_theme_options[od_font_size]" class="regular-text" type="text" name="odthemes_theme_options[od_font_size]" value="<?php esc_attr_e( $options[\'od_font_size\'] ); ?>" />
	</fieldset>
<div class="clear"></div>
</div>

</div> <!-- END Show Settings if Appearance checkbox is checked -->
</div>

<!-- Miscellaneous Section | Tab 3 -->
<div class="od-panel-section tab_content" id="od-panel-section-misc">

<!-- Footer Text -->
<div class="od-panel-field">
	<fieldset class="title">
		<label class="description" for="odthemes_theme_options[od_footer_text]"><?php _e( \'Player Footer Text\', \'odthemes\' ); ?></label>
		<div class="od-panel-description">Change footer text.</div>
	</fieldset>
	<fieldset class="data">
		<input id="odthemes_theme_options[od_footer_text]" class="regular-text" type="text" name="odthemes_theme_options[od_footer_text]" value="<?php esc_attr_e( $options[\'od_footer_text\'] ); ?>" />
	</fieldset>
<div class="clear"></div>
</div>

</div>
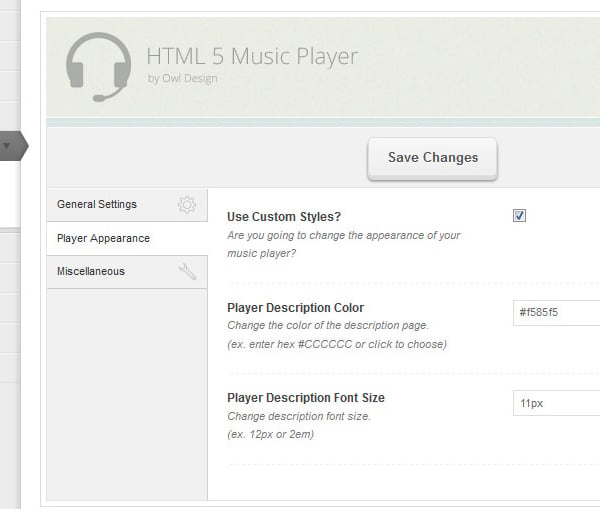
关于这两部分的简要说明。在外观中,我们添加了一个复选框,如果选中,我们将使用 jQuery 来显示选项,但如果未选中,选项将被隐藏。可用选项包括更改描述文本颜色和字体大小。在“其他”部分中,我们仅添加了一个选项,即页脚区域文本。
尚未保存任何内容。让我们确保我们可以保存我们的选择!将最后一段代码粘贴到 settings.php 文件中。确保将其添加到最后一行...
'
<?php
/* Sanitize and validate input. Accepts an array, return a sanitized array. */
function theme_options_validate( $input ) {
// Our checkbox value is either 0 or 1
if ( ! isset( $input[\'od_custom_css\'] ) )
$input[\'od_custom_css\'] = null;
$input[\'od_custom_css\'] = ( $input[\'od_custom_css\'] == 1 ? 1 : 0 );
// Text input
$input[\'music_tracks_to_show\'] = wp_filter_nohtml_kses( $input[\'music_tracks_to_show\'] );
$input[\'od_font_color\'] = wp_filter_nohtml_kses( $input[\'od_font_color\'] );
$input[\'od_font_size\'] = wp_filter_nohtml_kses( $input[\'od_font_size\'] );
$input[\'od_footer_text\'] = wp_filter_nohtml_kses( $input[\'od_footer_text\'] );
// Textarea
$input[\'music_player_description\'] = wp_filter_post_kses( $input[\'music_player_description\'] );
return $input;
}
现在我们所有的选项都已保存,让这个页面看起来不错。
Javascript
在添加样式之前,让我们添加 JavaScript 函数。进入您的 js 文件夹并打开 settings-script.js 文件。添加以下代码。当有人更改任何选项时,我们将使用此函数将 div 的颜色更改为红色。
'
// Function that will change color do a div whenver someone makes a change to the input fields
function activate_save_animation(e){
jQuery(\'.button-zone\').animate({
	backgroundColor: \'#f3d9d9\',
	borderLeftColor: \'#555\',
	borderRightColor: \'#555\'
});
jQuery(\'.button-zone button\').addClass(\'save-me-fool\');
}
下一段代码用于查看“播放器外观”部分中的复选框是否被选中。如果未选中,它将隐藏 id 为“extra”的 div。
'
// This bit of code shows extra options if the checkbox is checked
jQuery(document).ready(function($) {
if($(\'.checkme\').is(\':checked\')){
	$("#extra").show("fast");
} else
{
	$("#extra").css("display","none");
}
});
jQuery(document).ready(function($){
$(".checkme").click(function(){
if ($(".checkme").is(":checked")) {
	$("#extra").show("fast");
} else {
	$("#extra").hide("fast");
}
});
在上一个代码的下方添加下一个代码。我们创建了一个函数,当有人进行更改时,将背景颜色更改为红色,现在我们必须初始化它。
'
// If there was a change to the input fields fire up the \'activate_save_animation\' functions
$(\'#od-panel input, #od-panel select,#od-panel textarea\').live(\'change\', function(e){
	activate_save_animation(e);
);
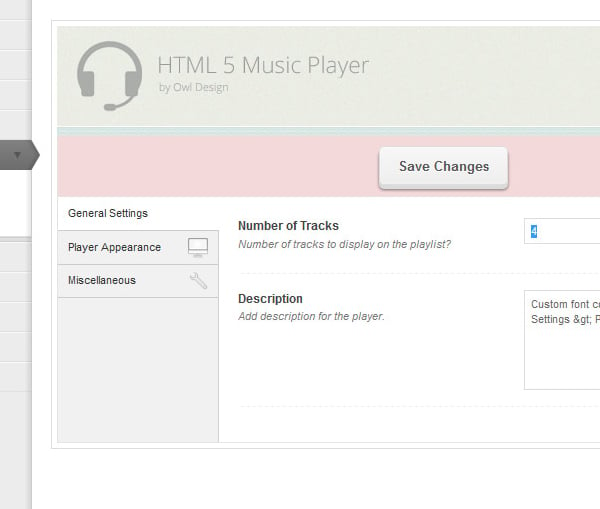
您现在可以进行测试,尝试更改任何选项,您会注意到“保存更改”周围的背景颜色发生了变化。下一个代码将激活我们的选项卡。
'
// Script for Tabs
$(".tab_content").hide(); //Hide all content
$("ul.tabs li:first").addClass("active").show(); //Activate first tab
$(".tab_content:first").show(); //Show first tab content
$("ul.tabs li").click(function() {
$("ul.tabs li").removeClass("active"); //Remove any "active" class
$(this).addClass("active"); //Add "active" class to selected tab
$(".tab_content").hide(); //Hide all tab content
var activeTab = $(this).find("a").attr("href"); //Find the href attribute value to identify theactive tab + content
$(activeTab).fadeIn(); //Fade in the active ID content
return false;
});
立即测试,他们现在应该导航到其特定的选项卡内容。我们要添加的最后一个代码是用于颜色选择器的。
'
// Script for color picker
$(\'#colorpicker\').ColorPicker({
	color: \'#ffffff\',
	onShow: function (colpkr) {
		$(colpkr).fadeIn(500);
		return false;
	},
	onHide: function (colpkr) {
		$(colpkr).fadeOut(500);
		return false;
	},
	onChange: function (hsb, hex, rgb) {
		$(\'#colorpicker\').attr(\'value\', \'#\' + hex);
	}
});
});
这应该是我们需要的完整 js 代码。
CSS
让我们确保一切看起来都很好。转到 css 文件夹并打开 settings-style.css 文件。第一段代码将稍微修复布局并添加一些图标。
'
/* Layout Styling */
.glowbr { background:#FFFFFF; border:1px solid #ddd; padding:5px; margin:0 auto;  }

/* Icons */
#od-panel-sidebar li.general { background:url(../images/general_icon.png) no-repeat center right; }
#od-panel-sidebar li.general:hover { background-color: #eaeaea; }
#od-panel-sidebar li.appearance { background:url(../images/appearance_icon.png) no-repeat center right; }
#od-panel-sidebar li.appearance:hover { background-color: #eaeaea; }
#od-panel-sidebar li.misc { background:url(../images/misc_icon.png) no-repeat center right; }
#od-panel-sidebar li.misc:hover { background-color: #eaeaea }
#od_logo { background:url(../images/od_logo.png) no-repeat; display:block; width:353px; height:71px; text-indent:-9999px; float:left;  }
#od_header{ height:70px; background:url(../images/head_bg.jpg) repeat scroll; border-bottom: 1px solid #fff; padding:15px 0 15px 20px; }
#od_bar { display:block; background:url(../images/border_strip.jpg) repeat-x; height:8px; width:100%; }
#od_subheader { background:url(../images/head_bg.jpg) repeat scroll; border-bottom: 1px solid #fff; height: 35px; padding: 0 10px; }
#od_subheader { background:url(../images/head_bg.jpg) repeat scroll;	border-bottom: 1px solid #fff; height: 35px;	padding: 0 10px; }
#od_subheader .sublinks { float: left; }
#od_subheader .savelink { float: right; padding-top:5px; }
#od_subheader .savelink img {	vertical-align:middle; }
#od_subheader a { color: #8d8d8d;	font-size: 11px;	text-decoration:none;	line-height:35px; }
#od_subheader .sublinks a	{ padding: 2px 20px; }
#od_subheader .sublinks a:hover	{ color:#4ca0bf; }
.subicon_support { background:url(../images/support_icon.png) 0 0 no-repeat; }
.subicon_documentation	{ background:url(../images/documentation_icon.png) 0 0 no-repeat; }
.subicon_log { background:url(../images/log_icon.jpg) 0 0 no-repeat; }
.subicon_at { background:url(../images/at_icon.png) 0 0 no-repeat; }
#od-panel { margin-top:30px; margin-right:20px; width: 785px; }
#od_main {  box-shadow: 0 1px 0 rgba(255,255,255,0.8) inset; -webkit-box-shadow: 0 1px 0 rgba(255,255,255,0.8) inset; -moz-box-shadow: 0 1px 0 rgba(255,255,255,0.8) inset; border: 1px solid #e3e3e3; border-top: 0; background: #fff url(../images/odfw_sidebar_bg.jpg) repeat-y top left; }
#od-panel-sidebar { float:left; width:160px; overflow: visible; margin-bottom:20px;  }
#od-panel-sidebar ul, #od-panel-sidebar li { list-style-type:none; margin:0; padding:0; }
#od-panel-sidebar a { display:block; font-size:11px; padding:8px 10px; border-bottom:1px solid #ccc; text-decoration:none; color:#333333;  }
#od-panel-sidebar li.active a { box-shadow: none;	-moz-box-shadow: none; background-color:#fff;	-webkit-box-shadow: none; width: 141px; }
#od-panel-content {  padding: 20px; margin-left: 0; float: left;	width: 570px;}
#od-panel-content, #od-panel-content p { font-size:11px; color:#666; }
.od-panel-section { display:none; }
.od-panel-section.od-panel-active { display:block; }
最后的 CSS 代码将设置按钮和表单字段的样式。
'
/*  Button Style */
#od-panel input[type="submit"], #od-panel input[type="button"], #od-panel button, #od-panel .button{
	font-family: Arial, Tahoma, sans-serif;
	font-weight: bold;
	border: 1px solid #2356a1;
	padding: 9px 15px;
	color: #fff;
	-moz-border-radius: 5px;
	-webkit-border-radius: 5px;
	border-radius: 5px;
	text-shadow: 0 -1px 0 hsla(214,100%,0%,.5);
	background: #1161a0;
	cursor: pointer;
	background: -webkit-gradient( linear, left top, left bottom, color-stop(.2, #3fa0ff), color-stop(1, #2356a1) );
	background: -moz-linear-gradient( center top, #3fa0ff 20%, #2356a1 100% );
	-webkit-box-shadow: inset 0 1px 1px hsla(0,100%,100%,.4), inset 0 -1px 0 hsla(0,100%,100%,.3), 0 4px 0 hsla(212,77%,26%,1), 0 5px 2px hsla(214,100%,0%,.5);
	-moz-box-shadow: inset 0 1px 1px hsla(0,100%,100%,.4), inset 0 -1px 0 hsla(0,100%,100%,.3), 0 4px 0 hsla(212,77%,26%,1), 0 5px 2px hsla(214,100%,0%,.5);
	box-shadow: inset 0 1px 1px hsla(0,100%,100%,.4), inset 0 -1px 0 hsla(0,100%,100%,.3), 0 4px 0 hsla(212,77%,26%,1), 0 5px 2px hsla(214,100%,0%,.5);
}
#od-panel input[type="submit"]:hover, #od-panel input[type="button"]:hover, #od-panel button:hover, #od-panel .button:hover {
	background: -webkit-gradient( linear, left top, left bottom, color-stop(.2,#5cabf8), color-stop(1, #3970c0) );
	background: -moz-linear-gradient( center top, #5cabf8 20%, #3970c0 100% ); }
#od-panel input[type="submit"].secondary, #od-panel input[type="button"].secondary, #od-panel button.secondary, #od-panel .secondary {
	border-color: #dddddd;
	background: #eeeeee;
	color: #555;text-shadow: 0 1px 0 hsla(0,0%,100%,1);
	background: -webkit-gradient( linear, left top, left bottom, color-stop(0, #f7f7f7), color-stop(1, #eeeeee) );
	background: -moz-linear-gradient( center top, #f7f7f7 0%, #eeeeee 100% );
	box-shadow: inset 0 1px 1px hsla(0,100%,100%,.4), inset 0 -1px 0 hsla(0,100%,100%,.3), 0 4px 0 hsla(0, 0%, 86%,1), 0 5px 2px hsla(0,0%,0%,0.5);
	-moz-box-shadow: inset 0 1px 1px hsla(0,100%,100%,.4), inset 0 -1px 0 hsla(0,100%,100%,.3), 0 4px 0 hsla(0, 0%, 86%,1), 0 5px 2px hsla(0,0%,0%,0.5);
	-webkit-box-shadow: inset 0 1px 1px hsla(0,100%,100%,.4), inset 0 -1px 0 hsla(0,100%,100%,.3), 0 4px 0 hsla(0, 0%, 86%,1), 0 5px 2px hsla(0,0%,0%,0.5); }
#od-panel input[type="submit"].secondary:hover, #od-panel input[type="button"].secondary:hover, #od-panel button.secondary:hover, #od-panel .secondary:hover { background: -webkit-gradient( linear, left top, left bottom, color-stop(.2, #f2f2f2), color-stop(1, #eee) ); background: -moz-linear-gradient( center top, #f2f2f2 20%, #eee 100% ); }
#od-panel input[type="submit"]:active, #od-panel input[type="button"]:active, #od-panel button:active, #od-panel .button:active { box-shadow: none;	-moz-box-shadow: none; -webkit-box-shadow: none; margin-top: 5px; margin-bottom: -5px; }
#od-panel input[type="submit"].secondary:active, #od-panel input[type="button"].secondary:active, #od-panel button.secondary:active, #od-panel .secondary:active { box-shadow: none; -moz-box-shadow: none; -webkit-box-shadow: none;	margin-top: 5px; margin-bottom: -5px; }
#od-panel .button-zone-wrapper {	clear: both; height: auto; background: #f1f1f1; box-shadow: 0 1px 0 rgba(255,255,255,0.8) inset; -webkit-box-shadow: 0 1px 0 rgba(255,255,255,0.8) inset; -moz-box-shadow: 0 1px 0 rgba(255,255,255,0.8) inset; border: 1px solid #e3e3e3;	z-index:999; }
#od-panel .button-zone {	padding: 10px; height:40px; z-index: 150; line-height: 1em; text-align: center; }
#od-panel fieldset { width: 50%; max-width: 50%; float: left; position: relative; }

/* Form Styles */
#od-panel-content fieldset.title{	width: 45%; margin-right: 5%; }

/* Fields Styling */
#od-panel-content .od-panel-field { margin-bottom:15px; padding-bottom:15px; border-bottom:1px dashed #eee; }
#od-panel-content label { font-weight:bold; color:#444; font-size:12px; margin-bottom:5px; text-shadow:1px 0 0 #fff; }
#od-panel-content .od-panel-description { font-style:italic; margin-bottom:5px; color:#777; text-shadow:1px 0 0 #fff; }
#od-panel-content input[type=text], #od-panel-content textarea, #od-panel-content option, #od-panel-select { border:1px solid #ddd; color:#666; font-size:11px; background:#fff; border-radius:0; -moz-border-radius:0; -webkit-border-radius:0;  }
#od-panel-content input[type=text], #od-panel-content textarea { padding:5px; }
#od-panel-content input[type=text] { width:270px; }
#od-panel-content textarea {  height:100px; }
这就是 css 样式的全部内容。我们现在已经完全完成了设置页面。
连接我们的选项
好的,让我们将所有选项连接到我们的音乐播放器。返回主题根文件夹并打开 header.php 文件。在文件的最顶部添加这段代码,它将获得我们所有的选项。
'
<?php $options = get_option(\'odthemes_theme_options\'); ?>
在 CSS 所在的 部分下方添加此代码。此代码是我们在播放器外观设置页面中设置的自定义 CSS 样式。
'
<?php if( $options[\'od_custom_css\'] == \'1\' ) : ?>
<style type="text/css" media="screen">
.description {
<?php if( $options[\'od_font_color\'] != \'\' ) : ?>color:<?php echo $options[\'od_font_color\']; ?> !important; <?php else: ?><?php endif; ?>
<?php if( $options[\'od_font_size\'] != \'\' ) : ?>font-size:<?php echo $options[\'od_font_size\']; ?> !important; <?php else: ?><?php endif; ?>
}
</style>
<?php else: ?>
<?php endif; ?>
您现在可以向描述文本添加一些自定义颜色和文本大小。尝试一下,如果一切顺利,它们的更改应该会生效。
让我们进行更多更改,找到下面的 js 代码...
'
<script>
$(document).ready(function(){
$(\'.music-player\').ttwMusicPlayer(myPlaylist, {
	tracksToShow:2,
	description:\'Hello, this is a demo description\',
	jPlayer:{
		swfPath: \'<?php bloginfo(\'template_directory\'); ?>/playlist/js/\',
	}
	});
});
</script>
我们可以选择更改曲目数量和描述文本。让我们添加一些代码,以便它可以实际工作。更改此:
'
	tracksToShow:2,
	description:\'Hello, this is a demo description\',
对此...
'
	tracksToShow:<?php echo $options[\'music_tracks_to_show\']; ?>,
	description:\'<?php echo $options[\'music_player_description\']; ?>\',
现在,我们可以从设置页面告诉播放器要显示多少曲目。还可以设置描述文本。
我们还有一个文件需要编辑,我们就完成了!打开 footer.php 文件。将您看到的所有代码替换为此代码...
'
<?php  $options = get_option(\'odthemes_theme_options\'); ?>
<div class="bar"></div>

<div id="footer">
	<?php if( $options[\'od_footer_text\'] != \'\' ) : ?>
	<p><?php echo $options[\'od_footer_text\']; ?></p>
<?php else: ?>
	<p><a href="http://owl-design.com/" title="Owl Design">Owl Design</a></p>
	<?php endif; ?>
</div>

</div>
</body>
</html>
这适用于“杂项”部分,您可以在其中添加自己的页脚文本。
我们完成了!
就这样,我们现在已经完成了音乐播放器和自定义设置页面!
请随意评论可以完成的改进或如果您有建议,就像我说的我不是专业人士,这就是我让它发挥作用的方式。


