在本教程中,我将演示 Magento 后端的自定义模块配置。在后端提供一组模块的可配置选项总是有用的,这允许管理员轻松配置模块特定的设置。我们将通过在 Magento 中创建自定义模块来逐步完成设置模块配置的过程。
Magento 中的自定义配置简介
作为一名开发人员,在创建自定义模块的过程中,您可能会觉得如果能够将某些模块特定设置的控制权转移到后端就好了。 Magento 允许您使用基于 XML 文件的配置系统来实现这一点。您只需按照 Magento 的约定设置文件,它们就会自动神奇地被拾取!大多数时候,您在设置基本前端存储时需要处理核心模块提供的大量可配置设置。
我假设您熟悉 Magento 中的基本模块创建过程。如果您想了解有关 Magento 中自定义模块的更多信息,这是一篇不错的文章。话虽如此,Magento 遵循约定优于配置的范例,如果您是自定义模块开发过程的新手,这应该会让事情更容易理解。
创建自定义模块以提供自定义配置
在本教程中,我将创建一个名为“CustomConfig”的基本自定义模块,该模块在系统 > 配置菜单下提供后端配置。以下是所需设置所需的文件列表:
-
app/etc/modules/Envato_All.xml:这是一个用于启用我们的自定义模块的文件。 -
app/code/local/Envato/CustomConfig/etc/config.xml:这是一个模块配置文件。 -
app/code/local/Envato/CustomConfig/etc/system.xml:这是一个声明我们模块的配置选项的文件。 -
app/code/local/Envato/CustomConfig/Model/Options.php:这是一个模型文件,为配置的某些表单元素提供选项。 -
app/code/local/Envato/CustomConfig/Helper/Data.php:这是 Magento 翻译系统使用的文件。
文件设置
首先,我们将创建一个模块启用程序文件。创建文件“app/etc/modules/Envato_All.xml”并将以下内容粘贴到该文件中。我们使用“Envato”作为模块命名空间,使用“CustomConfig”作为模块名称。默认情况下它将启用我们的“CustomConfig”模块。
<?xml version="1.0"?>
<config>
  <modules>
    <Envato_CustomConfig>
      <active>true</active>
      <codePool>local</codePool>
    </Envato_CustomConfig>
  </modules>
</config>
接下来,我们需要创建一个模块配置文件。创建“app/code/local/Envato/CustomConfig/etc/config.xml”并将以下内容粘贴到该文件中。
<?xml version="1.0"?>
<config>
    <modules>
        <Envato_CustomConfig>
            <version>0.0.1</version>
        </Envato_CustomConfig>
    </modules>
    <global>
        <helpers>
            <customconfig>
                <class>Envato_CustomConfig_Helper</class>
            </customconfig>
        </helpers>
        <models>
             <customconfig>
                <class>Envato_CustomConfig_Model</class>
             </customconfig>
        </models>
    </global>
    <adminhtml>
        <acl>
            <resources>
                <admin>
                    <children>
                        <system>
                            <children>
                                <config>
                                    <children>
                                        <customconfig_options>
                                            <title>Custom Configuration Section</title>
                                        </customconfig_options>
                                    </children>
                                </config>
                            </children>
                        </system>
                    </children>
                </admin>
            </resources>
        </acl>
    </adminhtml>
</config>
您应该熟悉 Magento 约定的模型和辅助类声明。当然, 标签对您来说是新的,这是我们在本教程中关心的内容。让我们详细了解每个标签以了解其代表的含义。
标签用于定义admin端的资源。在我们的示例中,模块的配置页面是一种资源。此外,我们使用 标签来包装
接下来的几个标签用于定义后端配置页面的路径。所以我们的配置页面的路径看起来像“admin/system/config/customconfig_options”。当然,最后一个标签
接下来,让我们定义最重要的文件“system.xml”。创建“app/code/local/Envato/CustomConfig/etc/system.xml”并将以下内容粘贴到该文件中。
<?xml version="1.0"?>
<config>
    <tabs>
        <customconfig translate="label" module="customconfig">
            <label>Custom Configuration Tab</label>
            <sort_order>1</sort_order>
        </customconfig>
    </tabs>

    <sections>
        <customconfig_options translate="label" module="customconfig">
            <label>Custom Configuration Settings</label>
            <tab>customconfig</tab>
            <frontend_type>text</frontend_type>
            <sort_order>1</sort_order>
            <show_in_default>1</show_in_default>
            <show_in_website>1</show_in_website>
            <show_in_store>1</show_in_store>
            <groups>
                <section_one translate="label">
                    <label>Section One</label>
                    <frontend_type>text</frontend_type>
                    <sort_order>1</sort_order>
                    <show_in_default>1</show_in_default>
                    <show_in_website>1</show_in_website>
                    <show_in_store>1</show_in_store>
                    <fields>
                        <custom_field_one>
                            <label>Custom Text Field</label>
                            <frontend_type>text</frontend_type>
                            <sort_order>1</sort_order>
                            <show_in_default>1</show_in_default>
                            <show_in_website>1</show_in_website>
                            <show_in_store>1</show_in_store>
                            <comment>Example of text field.</comment>
                        </custom_field_one>
                    </fields>
                </section_one>
                <section_two translate="label">
                    <label>Section Two</label>
                    <frontend_type>text</frontend_type>
                    <sort_order>2</sort_order>
                    <show_in_default>1</show_in_default>
                    <show_in_website>1</show_in_website>
                    <show_in_store>1</show_in_store>
                    <fields>
                        <custom_field_two>
                            <label>Custom Select Field</label>
                            <frontend_type>select</frontend_type>
                            <source_model>customconfig/options</source_model>
                            <sort_order>1</sort_order>
                            <show_in_default>1</show_in_default>
                            <show_in_website>1</show_in_website>
                            <show_in_store>1</show_in_store>
                            <comment>Example of select field.</comment>
                        </custom_field_two>
                        <custom_field_three>
                            <label>Custom Radio Field</label>
                            <frontend_type>radios</frontend_type>
                            <source_model>customconfig/options</source_model>
                            <sort_order>2</sort_order>
                            <show_in_default>1</show_in_default>
                            <show_in_website>1</show_in_website>
                            <show_in_store>1</show_in_store>
                            <comment>Example of radios field.</comment>
                        </custom_field_three>
                        <custom_field_four>
                            <label>Custom Multiselect Field</label>
                            <frontend_type>multiselect</frontend_type>
                            <source_model>customconfig/options</source_model>
                            <sort_order>3</sort_order>
                            <show_in_default>1</show_in_default>
                            <show_in_website>1</show_in_website>
                            <show_in_store>1</show_in_store>
                            <comment>Example of multiselect field.</comment>
                        </custom_field_four>
                    </fields>
                </section_two>
            </groups>
        </customconfig_options>
    </sections>
</config>
正如你可能已经猜到的,这个文件负责在后端显示我们模块的配置页面。让我们仔细看看该文件中的一些重要标签。
让我们尝试通过一个例子来理解它。转到 Magento 后端的系统 > 配置。您会注意到有不同的标签,例如常规、目录、客户等。
在每个选项卡下,您还会看到不同的部分。例如,高级标签下有管理、系统、高级和开发人员部分。在我们的例子中,我们将在自定义配置选项卡下有一个自定义配置设置部分。
接下来,我们使用
最后,我们使用
接下来,让我们创建一个模型文件“app/code/local/Envato/CustomConfig/Model/Options.php”。
<?php
class Envato_CustomConfig_Model_Options
{
  /**
   * Provide available options as a value/label array
   *
   * @return array
   */
  public function toOptionArray()
  {
    return array(
      array(\'value\'=>1, \'label\'=>\'One\'),
      array(\'value\'=>2, \'label\'=>\'Two\'),
      array(\'value\'=>3, \'label\'=>\'Three\'),
      array(\'value\'=>4, \'label\'=>\'Four\')
    );
  }
}
这里没有什么特别的 - 它只是用于将选项提供给单选表单字段并在配置表单中选择表单字段。
最后,我们需要创建“app/code/local/Envato/CustomConfig/Helper/Data.php”文件,以确保 Magento 的翻译系统正常工作。它几乎是一个空文件,但按照约定应该存在!
<?php
/**
 * Sample Widget Helper
 */
class Envato_CustomConfig_Helper_Data extends Mage_Core_Helper_Abstract
{
}
我们已经完成了文件设置。在下一节中,我们将检查它在 Magento 后端的外观。
浏览后端以测试自定义配置
前往 Magento 后端并清除所有缓存。可以通过转至系统 > 缓存管理来访问它。
现在,转到系统 > 配置打开配置页面。您应该会注意到页面左侧的自定义配置选项卡。在其下方,可以使用自定义配置设置链接,单击该链接将打开我们模块的配置页面。如果您看不到它,请尝试退出管理部分并重新登录。
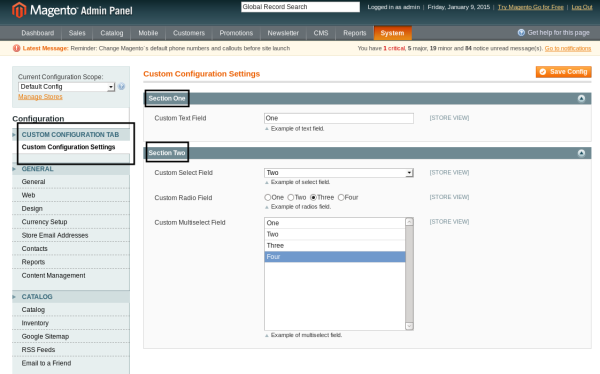
这是一个开箱即用的漂亮界面,不是吗?您可以尝试一下,填写表单并点击保存配置按钮来提交更改,Magento 将处理剩下的事情。
要访问代码中配置参数的值,可以使用 getStoreConfig 静态方法。例如,您可以使用以下语法检索 custom_field_one 参数的值:
Mage::getStoreConfig(\'customconfig_options/section_one/custom_field_one\');
语法相当简单 - 您需要使用 system.XML 文件中定义的“section_name/group_name/field_name”模式。
结论
管理系统配置是 Magento 最强大、最有用的部分之一。 Magento 允许您非常轻松地插入自定义配置参数,这要归功于最强大的电子商务系统之一的可扩展性!使用下面的提要分享您的想法!


